I’ve kept everyone updated the last 3 months after getting in on the first 100 units and the delays that have slowed delivery. To be clear, I am ecstatic that LNR took the time to correct issues that were found and to update their manufacturing along the way to improve the final product.
Would I have liked to have had it earlier? Yes, but better right than early in my opinion.
Unfortunately it came after my Christmas holiday and time off, so being back to work it is back to prioritizing my time.
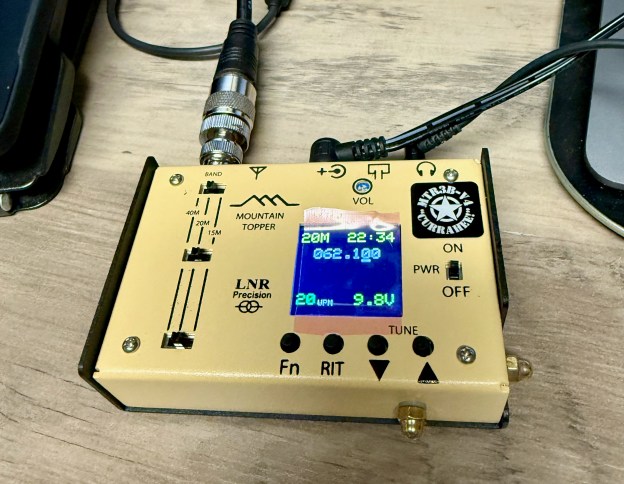
Having just had it on my desk for less than an hour and having a full afternoon and evening, I haven’t done much other than to turn it on, tune to a few stations, and play with the volume tuning. I also put the dummy load on and played with the capacitive touch keying a bit – will need more practice but so far it feels responsive and crisp.
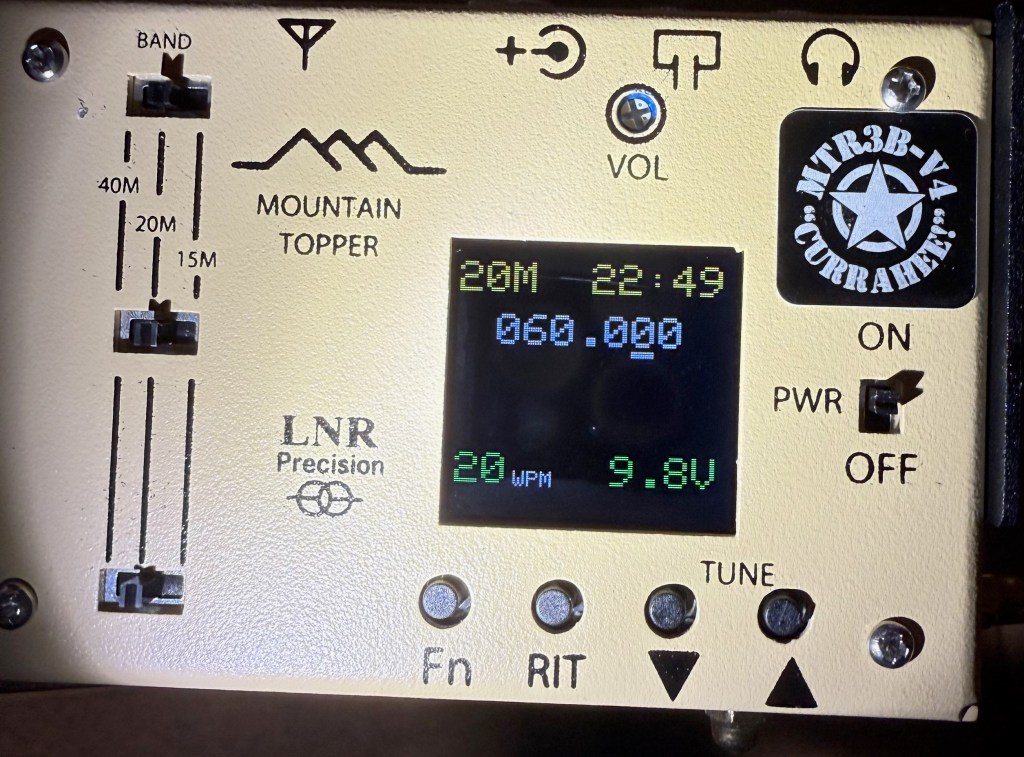
With the switch to a color OLED, one of the updates they made post-launch was to change the hues of the colors to prevent wash out in direct light. It is overcast today and getting late, but here is what it looks like under a flashlight for reference.
Not a real comparison to a bright sunny day, but at least with 450 lumens on top of the overhead lighting it is still readable (no image enhancement).
Finally before I have to run, here it is next to a Venus SW-3B, another ultra small 3 band portable.
Lots more needs to be done to put this little radio through its paces, but out of the box it is – so far – exactly what I was expecting and wanting.
Small, 40m or higher, and low power draw.
More to come….
UPDATE
Just a few minutes after posting this I got curious and quickly hooked up my Palm Paddle to it. I wanted to see if attaching an external paddle disabled the touch keyer and yes, it does. 🙂
UPDATE 2
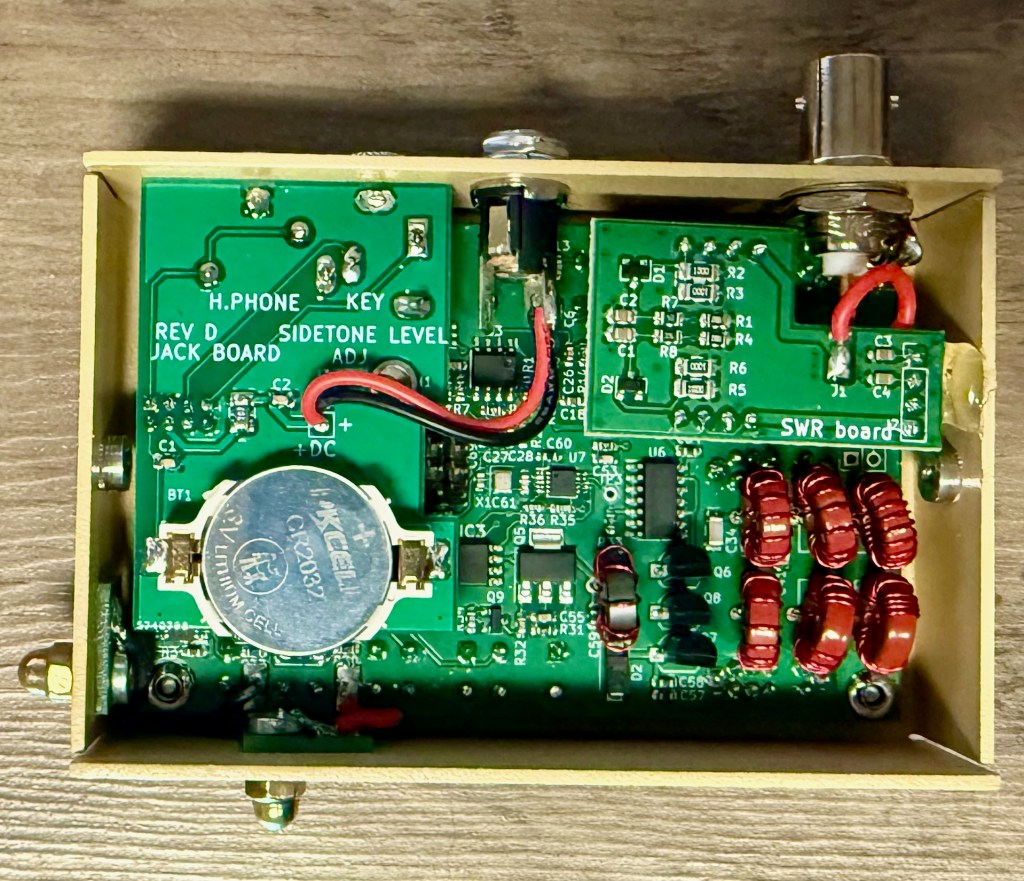
Adding a new photo of the internals
Question for everyone
What would be most useful for you as a consumer of this post? What about the new MTR3B could I provide to you as a reader, keeping in mind that the basics are all there on the LNR Precision website.
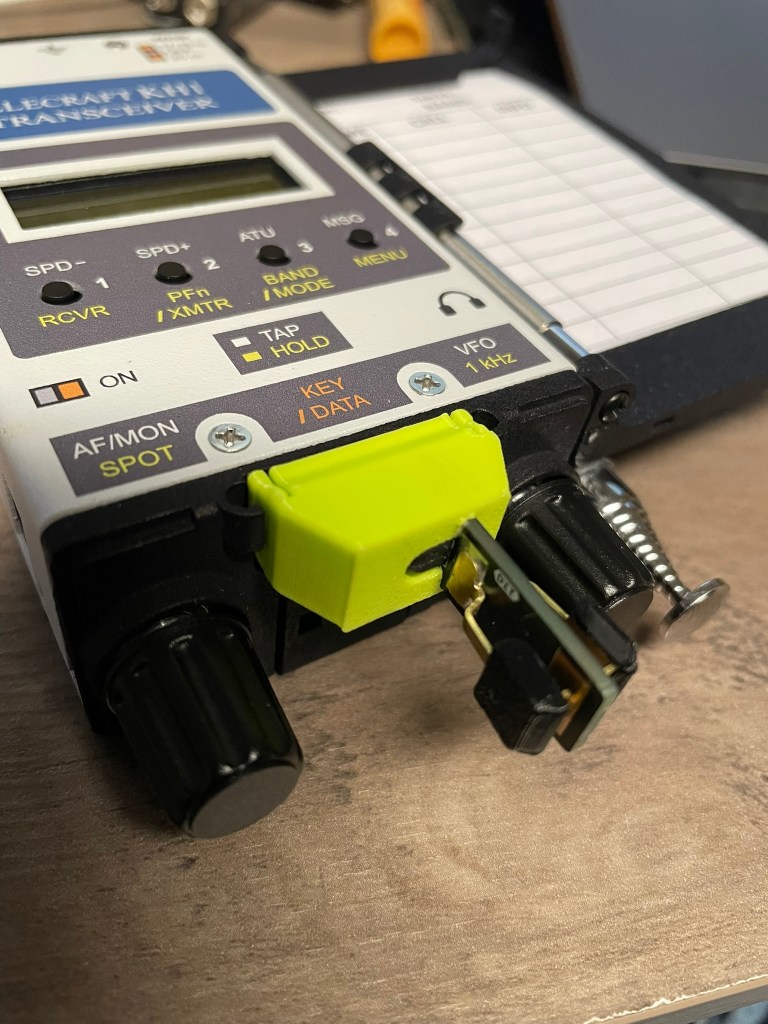
Ramping up my comfort level with the new KH1 and exploring paddle options, I came across Tufteln’s N6ARA Tiny Paddle (link) adapter (link).
After ordering, I then found that N6ARA’s page on Thingiverse and both that adapter and the adjustment tool are available for printing yourself.
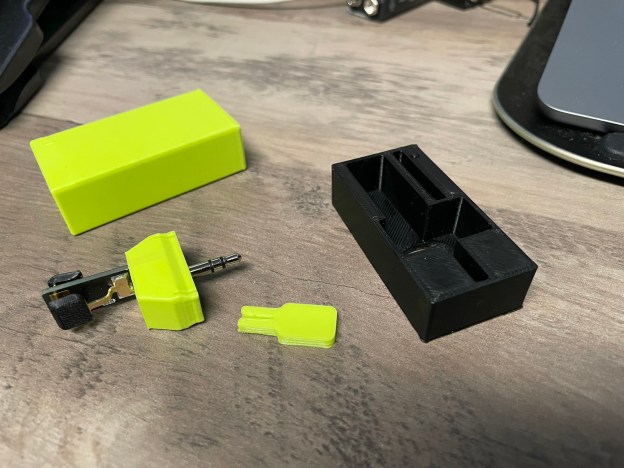
Tiny Paddle Adapter
N6ARA’s Tiny Paddle adapter for the KH1 is available here.
This is a really simple but effective way to stabilize the Tiny Paddle against the KH1 base and keep it from wobbling.
In testing this week, I’ve found it to be much more solid than the Elecraft v2 paddle, though I haven’t played too much in adjusting the latter due to how plug and play this one has been. In the shack at least, I’m a fan!
I’ll circle back with Elecraft’s offering at some point soon, but this hit the mark out of the gate.
It is pressure fit and doesn’t seem to be something to worry about slipping out when you least want it to. It took some pressure to get it inserted and in place. Not so much that you worry about breaking anything, but enough that once inserted it is solid.
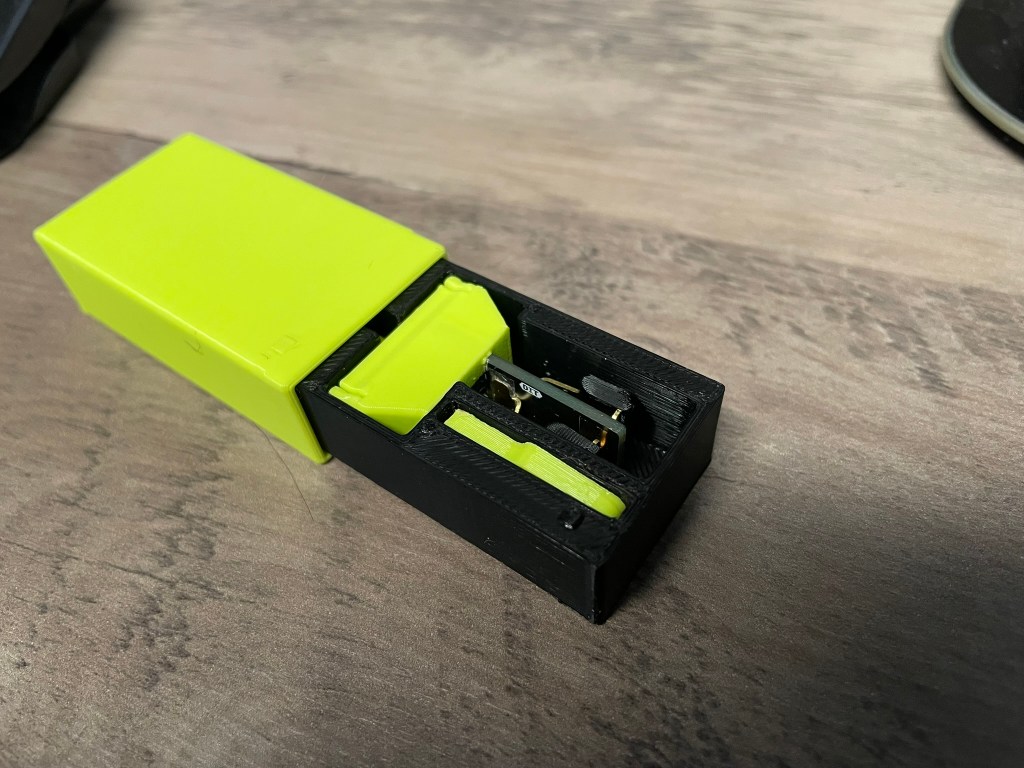
N6ARA Tiny Paddle Case
The Tiny Paddle will not fit into the Pelican M40 case when attached, and I’m not sure that I’d want them to given the potential for breaking something.
As with the paddle adapter above, the fit is tight but not too tight to get things in and out. A hole is in the base for one to push with a finger tip and get the paddle out without breaking anything.
A slot provides storage for the adjustment tool which is also available for printing from N6ARA’s Thingiverse page.
Conclusion
As the user base for this little radio grows I anticipate seeing more and more models available. I just found this one from user scottpav on Thingiverse which is a power switch cover. Might throw this one on the printer later today and give it a try.
I’ve had it less than a week but thought I’d take a moment to share my thoughts after the first use. No pictures though as they are really easy to find and given that this is a handheld setup, I didn’t take any with both hands being occupied for my first use.
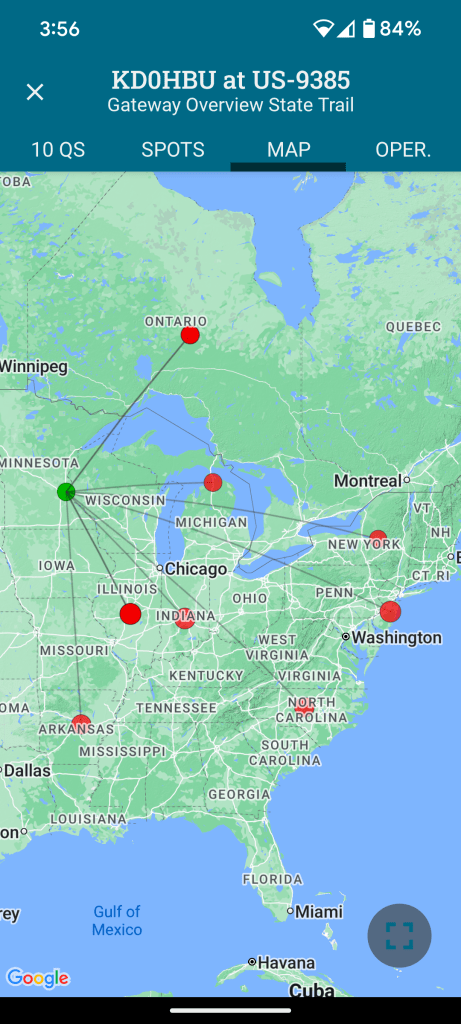
On the way home from work today I stopped at a previously unknown park – US-9385 – and do a quick activation. I’ve driven by this park hundreds of times and never knew it was there until I saw it on the POTA website maps.
This scenario is exactly why I bought this radio. Short, quick stops or lightweight, all-in-one kits on extended trips type situations. I stopped at the park, found a spot to park the truck, walked a ways to a bench, and then was on the air in less than 2-3 minutes.
No throw line. No vertical antenna assembly. No coax along the ground.
Granted, no gain and no elevation for the antenna, but that is exactly what this setup (the Edgewood package) is – a quick and easy to deploy kit with classic Elecraft quality.
20 meters wasn’t the best at the time (should have considered 15m given the time of day), but I still had 10 contacts in about 26 minutes. Not bad in my book. I did have one hunter tell me “QSB QSB”, which I can confirm was the case with one of the contacts I received. He was in and out.
Map of contacts below. Note that having two in Ontario and two in Indiana means that the dots below overlap. 10 contacts but eight dots on the map.
Overall Impressions
There is a lot in this little package. It fits nicely in the hand (I hold it in my left to leave my right free for sending CW and logging contacts). Not too wide for my hands, and not so narrow that I fumble with it.
Your mileage may vary.
The screen isn’t huge, but even as someone with reading glasses I had no trouble with clarity of the characters.
Keeping things small means that there are few buttons (4 in total) and, with the small screen there is a short learning curve on how to navigate. The printed manual is well laid out as usual and reading it end to end gives you all you need to get going quickly.
The Paddle
The included paddle (at least included in the Edgewood Package) is the v2 at this point (I believe). My opinions here are mixed. While it isn’t uncommon for me to have to correct something I send, and perhaps it was just today being the first time I’ve had this on the air, I found myself constantly having to send corrections. In the shack it felt fine, but actually at the park bench operating it was different somehow.
Standing up halfway through the activation actually felt more natural than sitting with it in my hands. Not sure why, but it changed the dynamic just slightly.
I felt sloppy and unable to fine tune my sends like I can with other external paddles. This seems to align with other people’s impressions even with the v2. I plan on getting the N6ARA tiny paddle adapter from Tufteln. Every person I’ve seen review it raves about that combo with this radio.
It is still well designed as a portable paddle that can be turned around in its connection to keep it out of the way for transport.
If you want a great paddle comparison, check out N7KOM’s video on the subject.
The Screen Cover/Logbook
The included screen cover is well designed and fits snugly. It has slots for paper logs (Elecraft makes them available here) and a small pen that is included in the package.
The pen is basic, metal, and small. It works as intended but may not be well liked by folks with bigger paws. The pen tip produces a line that isn’t too wide for the size of the log paper rows, so it is well selected for the intended purposes.
The log pages are just the most important information. QTH, Date, and Band at the top, with a table below it with rows to record Time, Call, and Info (I use that for QTH or reported P2P identifiers). I find that you have to stack several of them to keep them from moving side to side when writing.
The Battery
I haven’t put it through its paces yet, but it seems to be more than enough for what this is built for.
Charging is not a quick affair. Out of the box I let it charge for several hours. They have a quick charger available that has to be used with the battery taken out of the radio. The built-in charger does its job albeit slowly.
Other Notes
If you use headphones or ear buds (and I recommend you do), find some with a right-angle plug. I found that my straight connector plug ear buds interfered with the screen cover.
The Case and an Alternative
The included case with the Edgewood Package is standard Elecraft fare. It is a scaled down version of the cases for the KX2 and KX2. Minimal, soft, and with a couple of pockets on the outside (and one slot pocket inside).
Seeing Tufteln’s modified Pelican M40 case, I decided to grab one myself and go to work with my heat gun. They are readily available on Amazon or local outdoor retailers. I will say, however, that if you’re not confident and willing to potentially ruin an otherwise great case, going the Tufteln route might be the best option.
About ten minutes total time of carefully, slowly heating each side where the antenna is too long to go into the case, and then slowly putting pressure with a rounded object gave me just enough room on each side to easily get the radio with attached antenna (side storage attachments, not attached to the top connector).
If you go this route be really careful not to change the fit of the two halves of the case together. Keeping the heat focused below the lip of the bottom half and keeping the pressure on the rounded object about halfway between the bottom and the lip is what worked well for me.
Putting the coiled counterpoise wire on top of the radio and closing the lid provided enough friction/pressure when closed to keep things from sliding around inside.
This isn’t as lightweight as using the soft sided case from Elecraft, but offers far more protection from weather and bumps.
Conclusions
So, am I happy with this little radio given all the many months of being on the fence whether to purchase or not?
After one park activation and roughly 11 QSOs total?
An emphatic yes*
(*I don’t regret it at all – yet – but it isn’t a “buy once, cry once” radio)
It is smaller than my KX2. It lacks the capability and frequency range of the KX2 as well, let alone the other mode availability.
It does, however, provide ergonomics, portability, and my most used bands in a smaller package.
If I could only choose one of the two, which would I land on?
The KX2 is the better radio overall in my opinion. But I can honestly say that even with the AX1 antenna, I’ve never been able to comfortably stand and send CW like I could today with the KH1.
Going someplace without trees and a place to sit, standing there with KH1 in hand is an option I didn’t feel like I could do easily with the KX2. Since I don’t do much voice operations, the KX2 feels like more radio than I need. Having said that, having the option of SSB is something I may be glad to have depending on the situation.
Of course, having gotten my KX2 used for a really, really great price means that it is an easier pill to swallow than if I bought both at MSRP with all the options.
The KH1 fits my use cases well. As with any large purchase, and ham radio is nothing if not large purchases for most people, take your time and do your research.
An Aside
With today being October 1st, did anyone get in on the first 100 new MTR3b units that became available today?
Capacitive touch keyer built-in. Volume control (something lacking in my MTR4b). Adjustable side tone. Color LCD display.
All in a ~134g package.
They say they plan on ramping up production to large scale due to their anticipated demand, and having sold out the 100 units today in “…a few minutes” seems to validate their assumptions.
The folks at Xiegu have provided minor updates to their popular G90 and the newer G106 transceivers.
G90 Changelog
UPDATE DISP UNIT ONLY!!
File: G90_DispUnit_Fw_V1.80
SHA-256: B0730B08500DFDD2BA767B390CD349606252B0B44FBBA7DE3130F192A1493F3A

[EN]
1. To work with JTDX/WSJTX (or some other data mode softwares), add CI-V commands 0x25,0x26,
   See <<XIEGU RADIO CI-V REFERENCE>> and <<XIEGU RADIO JTDX WSJTX SETTINGs>>
2. Add CI-V command 0x1d 0x19, read the XIEGU RADIO ID,
   See <<XIEGU RADIO CI-V REFERENCE>>
And for the G106
[EN]
1. To work with JTDX/WSJTX (or some other data mode softwares), add CI-V commands 0x25,0x26,
   See <<XIEGU RADIO CI-V REFERENCE>> and <<XIEGU RADIO JTDX WSJTX SETTINGs>>
2. Add CI-V command 0x1d 0x19, read the XIEGU RADIO ID,
   See <<XIEGU RADIO CI-V REFERENCE>>
3. Bug fix: Can't totally mute when RX volum set to 0
4. Bug fix: ACC TRX Pin is output only (now it's bidirectional)
5. Bug fix: Won't lock the long press key
6. Set RX audio bandwidth to 10~3300Hz in data mode
Neither brings with it substantive capability updates, but always nice to see a company continue to update their offerings.
It’s been a while since an update was last provided for this transceiver, but this looks to have quite a few enhancements and fixes provided so that is probably why.
From the release notes:
V1.1.6 Release Note
Image File SHA256: 1D5D97118E34963B0BA338CD974BD456577E21475F487F0154D9537112A8A64B
APP:  V1.1.6 Nov  2 2022,13:10:22
BASE: V1.1.6 Nov  1 2022,17:37:32

1. Add CI-V instruction:
   1A 01 (C1) (C2)
   C1: band index, See IC-705 CI-V Command Table
   C2: bandstack register number(not use), See IC-705 CI-V Command Table
   X6100 send back         description
   FE FE                   # 2 byte, CI-V header
   E0 XX 1A 01 01 01       # 6 bytes, The command payload, XX is the rig's address
   00 00 80 01 00          # 5 bytes, Operating frequency setting
   03 02                   # 2 bytes, Operating mode setting
   00                      # 1 byte, Data mode setting
   00                      # 1 byte, Duplex and Tone settings
   00                      # 1 byte, Digital squelch setting
   00 08 85                # 3 bytes, Repeater tone frequency setting
   00 08 85                # 3 bytes, Repeater tone frequency setting
   00 00 23                # 3 bytes, DTCS code setting
   00                      # 1 byte, DV Digital code squelch setting
   00 50 00                # 3 bytes, Duplex offset frequency setting
   58 36 31 30 30 20 20 20 # 8 bytes, UR (Destination) call sign setting
   20 20 20 20 20 20 20 20 # 8 bytes, R1 (Access repeater) call sign setting
   20 20 20 20 20 20 20 20 # 8 bytes, R2 (Gateway/Link repeater) call sign setting
   FD                      # 1 byte, CI-V tail
2. Add CI-V instruction:
   1A 06
   See IC-705 CI-V Command Table
3. Add CI-V instruction:
   21 00
   21 01
   21 02
   See IC-705 CI-V Command Table
4. Add CI-V instruction:
   26 (C1) (C2) (C3) (C4)
   C1: VFO index
       0:     Foreground VFO
       other: Background VFO
   C2: Operating mode
       See IC-705 CI-V Command Table
   C3: Data mode
       0:     OFF
       other: ON
   C4: Filter setting
       1:     FILTER1
       2:     FILTER2
       3:     FILTER3
       other: Invalid
   *Note: [LSB/USB mode]         with Data mode ON -> L-DIG/U-DIG
          [Other operating mode] with Data mode ON -> No effect
5. Add bluetooth SPP, virtual serial port for FLRIG, Omni-Rig or other CI-V based software
6. Fix the Fc marker bug in modem mode (there will be two markers in the audio FFT scope in some cases)
7. Optimize the fw updating process via sd card, the user data (configures, voices, channels) will not be cleared after updating
8. Some adjustments of the main window
   8.1 Add LOCAL TIME / UTC TIME widget
   8.2 Add RIT / XIT widget
   8.3 Add audio oscilloscope
   8.4 Add filter icon (shows filter group as will)
9. Add auto-level for the waterfall
10. Fix bluetooth issue (stuck in the startup screen or the bluetooth setting window)
11. Fix ntp update issue (make sure X6100 can access to the internet via built-in WiFi or USB to Ethernet dongle)
12. Show MAC address in the Bluetooth / WiFi setting windows (in the title of the window)
13. Optimize the TIME SETTING operation logic
14. Optimize the FFT SPAN (or FFT ZOOM), now it has four items: 100k,50k,25k,12.5k
15. Optimize the "Flat-Menu" operation logic, Press "MFK" to select the current item to the fast-access tag and return to the main window
    example 1: In "RADIO SETTING1" page, "TX POWER" is selected, press "MFK" then "TX POWER" is added to the fast-access tag
    example 2: In "DISPLAY SETTINGS" page, "FFT SPAM" is selected, press "MFK" then "FFT SPAM" is added to the fast-access tag
    *Note: "selected" means the item get the focus
16. Optimize AGC algorithm
    16.1 AGC time constant is more accurate
    16.2 Background noise is much lower without antenna plugged in (except FM mode)

Tips & Note:
#### Most of the CI-V instructions compatible with ICOM-705
#### Ham Radio Deluxe may not recognize the bluetooth virtual serial port
#### Serial port remap (could be critial when working with the bluetooth virtual serial port):
Why remap:
   FLRIG/WSJTDX/JTDX may fail to connect to the bluetooth virtual serial port (due to the mechanism of rfcomm itself)
Roadmap and Tools:
com0com:
1) install com0com
2) Run "Setup Command Prompt" (the CLI for com0com)
   install protname=COMxxx -
   xxx is the port number, choose a unoccupied one, for example: 88
3) Close the CLI
hub4com:
1) Enter hub4com dir, looks like this:
   X:\hub4com-2.1.0.0-386>
2) Input the command in the MS CLI
   hub4com --route=All:All \\.\COMyyy \\.\CNCB0
   COMyyy is the bluetooth virtual serial port number, for example: COM4
   hub4com --route=All:All \\.\COM4 \\.\CNCB0
   The CLI's output should be look like the below:
   COM4 Open("\\.COM4", baud=19200, data=8, parity=no, stop=1, octs=on, odsr=off, ox=off, ix=off, idsr=off, ito=0) - OK
   CNCB0 Open("\\.CNCB0", baud=19200, data=8, parity=no, stop=1, octs=on, odsr=off, ox=off, ix=off, idsr=off, ito=0) - OK
   Route data COM4(0) --> CNCB0(1)
   Route data CNCB0(1) --> COM4(0)
   Route flow control COM4(0) --> CNCB0(1)
   Route flow control CNCB0(1) --> COM4(0)
   Started COM3(0)
   Started CNCB0(1)
FLRIG/WSJTDX/JTDX:
1) Com port for CI-V should be the one we choose in the com0com, which in this case would be COM88
I have just downloaded and haven’t applied it yet, but will circle back if anything seems significantly improved.