Ramping up my comfort level with the new KH1 and exploring paddle options, I came across Tufteln’s N6ARA Tiny Paddle (link) adapter (link).
After ordering, I then found that N6ARA’s page on Thingiverse and both that adapter and the adjustment tool are available for printing yourself.
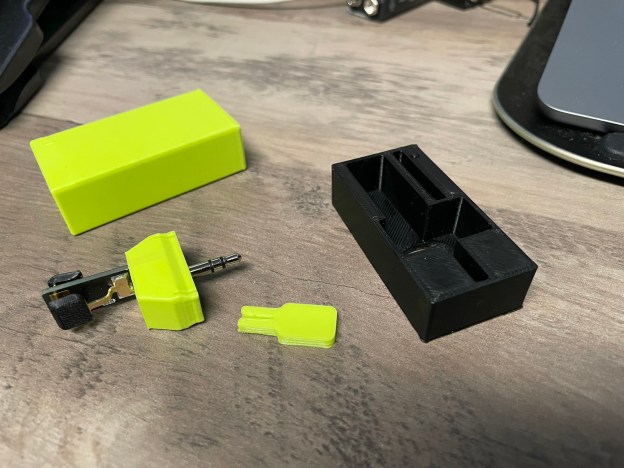
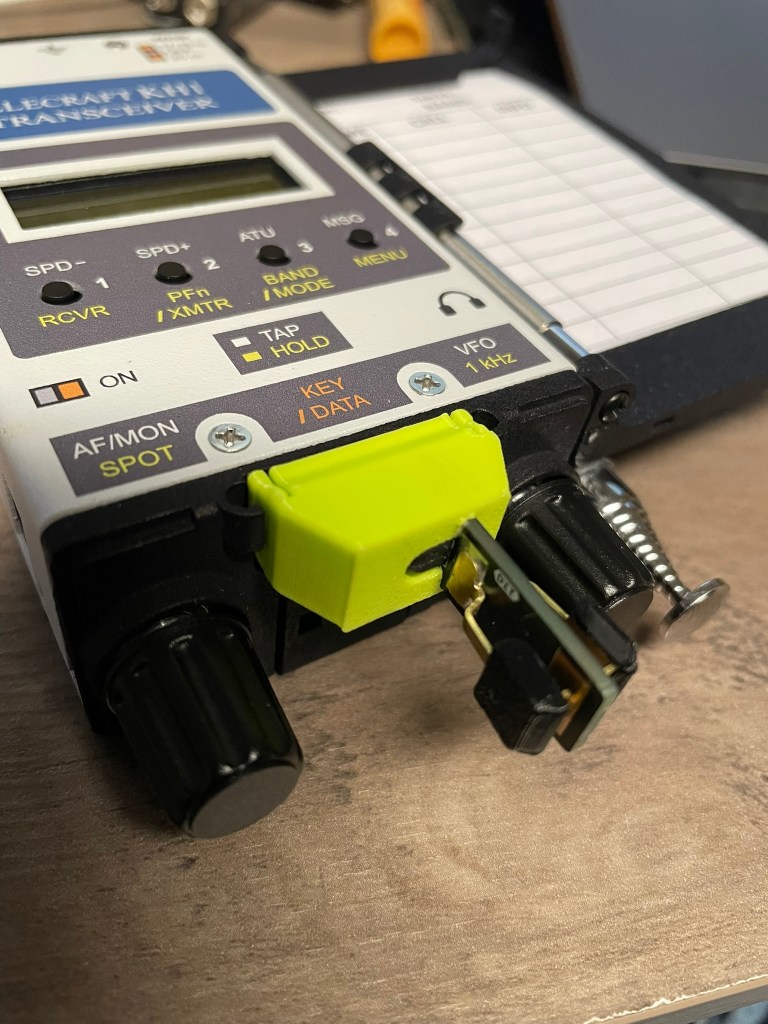
Tiny Paddle Adapter
N6ARA’s Tiny Paddle adapter for the KH1 is available here.
This is a really simple but effective way to stabilize the Tiny Paddle against the KH1 base and keep it from wobbling.
In testing this week, I’ve found it to be much more solid than the Elecraft v2 paddle, though I haven’t played too much in adjusting the latter due to how plug and play this one has been. In the shack at least, I’m a fan!
I’ll circle back with Elecraft’s offering at some point soon, but this hit the mark out of the gate.
It is pressure fit and doesn’t seem to be something to worry about slipping out when you least want it to. It took some pressure to get it inserted and in place. Not so much that you worry about breaking anything, but enough that once inserted it is solid.
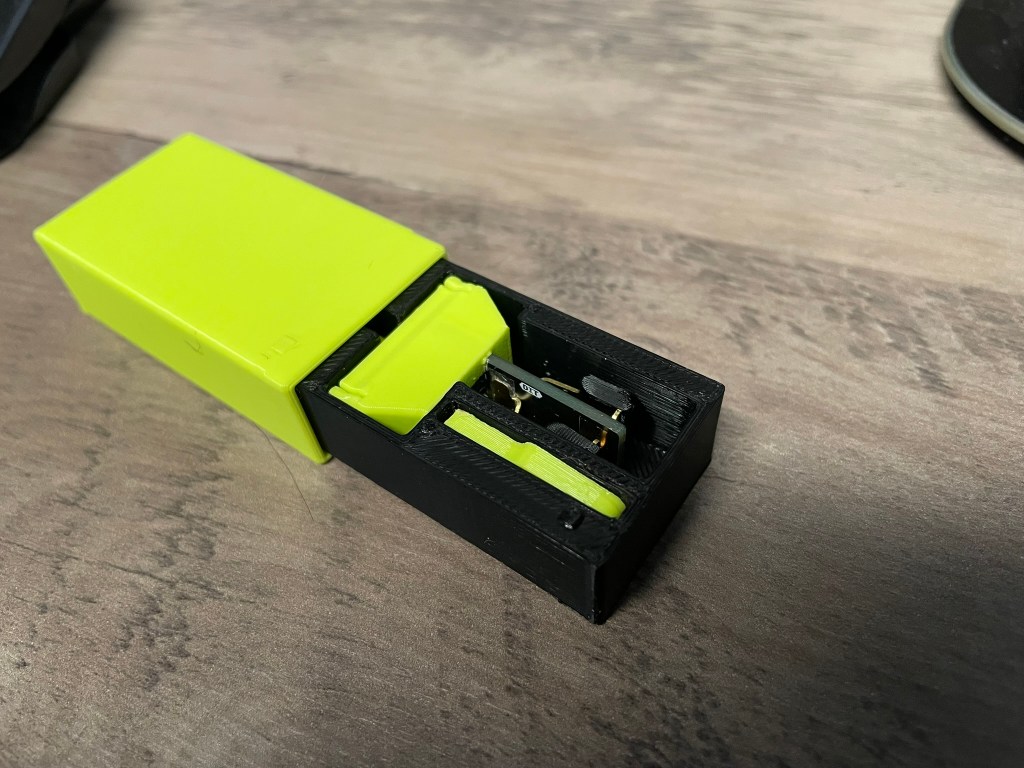
N6ARA Tiny Paddle Case
The Tiny Paddle will not fit into the Pelican M40 case when attached, and I’m not sure that I’d want them to given the potential for breaking something.
As with the paddle adapter above, the fit is tight but not too tight to get things in and out. A hole is in the base for one to push with a finger tip and get the paddle out without breaking anything.
A slot provides storage for the adjustment tool which is also available for printing from N6ARA’s Thingiverse page.
Conclusion
As the user base for this little radio grows I anticipate seeing more and more models available. I just found this one from user scottpav on Thingiverse which is a power switch cover. Might throw this one on the printer later today and give it a try.
I’ve owned a few different printers now over the years and am currently running a Creality Ender 3 v2 Neo and a FlashForge Adventurer 3.
The Ender 3 v2 Neo prints PETG and TPU beautifully. The FlashForge can spit out small PLA and ABS prints without troubleshooting.
This is not a 3d printer review but I’m mentioning because I know I’ll be asked.
This is highlighting some of the cool prints (I think anyway) that I’ve leveraged over the last couple of years that might be helpful to you. I’ve broken them down by high level types.
Of front I’ll just say that I now print almost entirely in PETG. I’ve found it combines a lot of the properties of ABS and PLA that I’ve desired for different uses into a single offering. It isn’t perfect, but it works for almost all of my needs today. (TPU not withstanding 🙂 )
Antennas and Accessories
Simple searches for things like EFHW antennas can turn up several options. I’ve done a couple of them including this one.
If you have built one of K6ARK‘s antenna kits then this might be of use to you. His antenna winder design has a built-in BNC clip and it fits the 9:1 random wire build I did recently. His repository on Printables can be found here.
Other wire antenna winder examples can be found here and here.
Speaking of K6ARK’s models linked above, I recently printed both his dual level paddle and single level paddle models.
Here is the dual lever paddle next to the excellent CW Morse portable paddle. I’m putting together a review of this and the single lever model shortly.
Radio Specific Prints
I just completed this build for my x6100 over the weekend.
It adds side, front, top, and bottom protection while leaving the back exposed for heat management. Additionally, the top and bottom pieces have a 3mm or so gap between them and the radio which, plus cutouts, allow for airflow across the heatsinks as well.
This is the first print where I’ve used heat set inserts to connect prints together and I’m sold on the utility of them. Combined with the 12 (yes, 12) M3x25 screws it is a very solid accessory that I expect will last quite a while.
(and if something breaks I’ll just print another)
mcHF cover to protect the front controls. This print was done with an earlier printer that I’ve since given to my son, and there is significant lifting on each end that I’ve since solved. I kind of like the curve it created though…
Yes you can see just how well PETG sticks to painter tape. This was done with my original Ender 3 (i.e. v1.1.3 mainboard – yikes!). Doesn’t affect the functionality or strength.
You can also print the end caps shown above using this model. Note that was done with a resin printer and I am probably going to reprint them in PETG. Resin doesn’t have quite the durability I need.
Some other radio specific prints I have either already printed or have in my queue to do so:
Ever since I started seeing Thomas’ posts using the kneeboard that CarolAnne N0RNM had created for him, I’ve been wanting something similar. I even started mocking something up in Tinkercad, so seeing this post made me ecstatic.
Dale’s version is slightly larger than what Thomas has, and I had to reduce the print size by 10% to get it to print well on my printer, but so far the first half is looking good. I’ll get the rest printed and assembled and post the results.
In the meanwhile, enjoy (and bookmark Thomas’ site – he is awesome!).
I’ve had a couple of days to play with the new (tr)uSDX 5-band transceiver and I thought I would do a quick post to show my initial impressions of this kit.
Overview
The (tr)uSDX Radio is a project created by DL2MAN and PE1NNZ, based off of the uSDX project.
It covers 5 amateur bands – 80/60/40/30/20 meters and is multi-mode – CW, SSB (LSB|USB), and AM/FM.
There is an onboard speaker and a mic, though external ones are recommended.
Please keep in mind that this project’s intent was to (through the use of group buys, etc.) allow for a user to acquire the necessary parts for about $50 USD. With the supply chain issues affecting the whole world right now, sourcing parts is increasing that cost quite a bit, so authorized suppliers like those they’ve partnered with are one of the only reliable methods of getting everything in an easy fashion.
Please also keep in mind that this radio is not an IC-705 or a KX2. It is not meant to be, and my comments below will be framed within the context of what this radio is, not what it isn’t.
It’s Here!
Note that I ordered two – one pre-assembled with the case, and one that is the raw kit without the case (I’m 3D printing my own).
This gives me the opportunity to see if there are any advantages to either method other than price. That and I like radios.
It is an addiction.
It arrived safe and sound on Thursday, April 7th. My first impressions when receiving the box was:
“OH NO!”
Those fears were unfounded as the rig was well padded inside with very thick and sturdy bubble wrap.
Packaged in the box is the radio and an unterminated power cable.
The bubble wrap they used is not the standard type that is seen in packaging all over, rather it is of a series of long inflated tubes. The material is quite a bit stronger than typical bubble wrap and takes a lot more effort to puncture.
A+!!!
Part of building the (tr)uSDX is loading the boot loader, then using the serial number to download a personalized firmware image.
The supplier does all that for you, and provides a label on the packaging including the serial number for your reference when doing firmware upgrades.
If you lose it, the only way to see your serial number again is to re-flash the boot loader and erase the existing firmware.
So far so good.
Before getting anything powered up and on the air we needed a power cable. The supplied cable is a 3.5mm to 1.35mm DC plug. It is smaller than the standard 5.5mm to 2.1mm plugs that most radios accept, and so you will need to either attached some connects to the bare ends of the plug, or get an adapter.
I found an adapter on Amazon that lets me avoid using yet another set of Powerpoles and instead use the existing plugs I have to bring the size down to what this radio needs. You can grab a set at on Amazon at https://www.amazon.com/dp/B07FJLZGPF?th=1
Or you can attach a set of connectors of course.
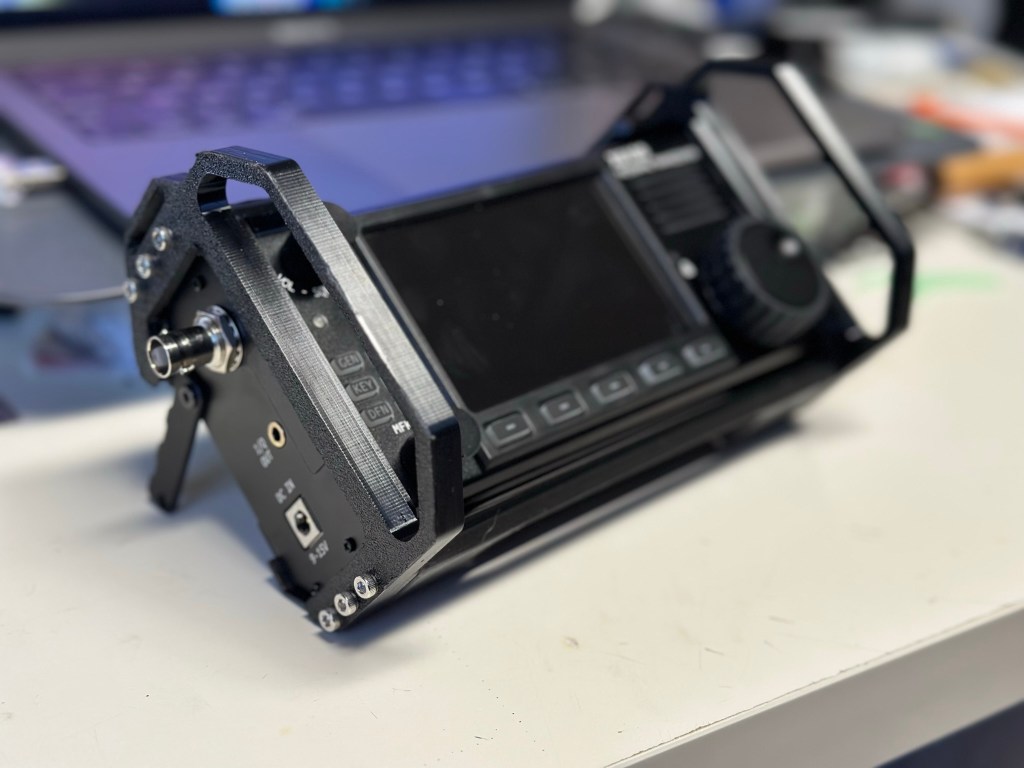
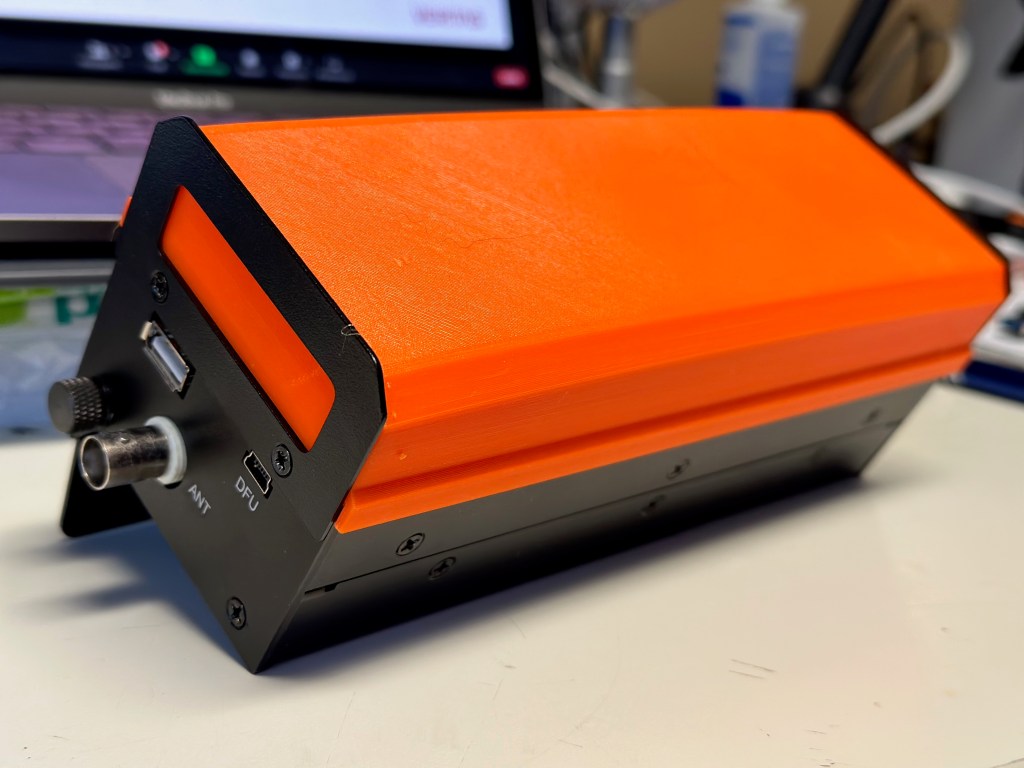
The Radio
The supplied case is 3D Printed and feels like it is done out of PETG. The quality of the print is quite good – the details are all there, the seams are solid and it just feels sturdy. The orange feels like the same shade of orange sherbet ice cream – kind of washed out in color.
I think if I had to do it over again I might have chosen the other color which is an olive drab. I say that as a fan of the color orange.
Just nit-picking on my part.
The case design, is in my opinion, superb. Everything was well thought out. There are four individual side pieces, and a top and bottom piece. The sides have internal slots that the PCBs fit into, securing them in place.
There is absolutely no wiggle room in any part of the case. Everything is tight and snug.
The tuning knob is also 3D printed, and fits tightly onto the stem without worry about falling off. There is no set screw, nor is there one needed.
It is all held together by 8 flat headed screws.
The whole case (minus the knobs, screws, and BNC adapter) measures 60.5mm by 90mm by 30mm.
Or in other words, about 2/3s the length and width of my iPhone.
It is tiny.
They must have a dual nozzle printer, or at least one that is capable of pausing to change out filament colors as the raised lettering is black filament printed on the orange base. It isn’t painted.
The power portUSB power and PAThe bottom of the rig – if you look closely you can see that the left side – in the middle – has a slightly darker rectangle. That is a thinner section that can be removed to allow direct access to the AVR programming pinsThe working end of the radio – Mic/Key port, Audio port, and the BNC to SMA connector (included) The RF board in all its glory! Note that all the windings are evenly spaced, and everything is neat and tidy.
Size Comparison with QCX-mini
Size-wise the two radios are extremely close, with the (tr)uSDX only slightly thicker front-to-back.
That makes the capabilities of this little transceiver even that more amazing to me – it is multi-band and multi-mode in a package that is similar to, what I think anyway, is the best portable single-band CW rig available.
There are tradeoffs for that though as we’ll see shortly. (again, not speaking to that as a negative, rather recognizing that this is a jack of all trades type radio and not a master of one, whereas the QCX-mini does one band and CW extremely well)
First Time Powering On
Upon powering up the radio, you are greeted with your callsign on a brightly lit interface. The onboard speaker is quite small, and results in a ringing tone when driven by too high of volume as to be expected given the size.
It automatically shuts off when an audio cable is inserted for an external speaker or headphones.
There are four buttons – Menu, Enter, PTT, and the tuning knob can be depressed for certain menu navigations, and the speaker rounds out the front face of the case.
There are built-in calibration tools, including a meter that shows power output and relative efficiency.
Out of the box I got the following:
Band
Power Output
Efficiency
80 meter
7.88 Watts
76.62%
60 meter
6.54 Watts
89.86%
40 meter
6.87 Watts
89.48%
30 meter
7.78 Watts
88.18%
20 Meter
7.06 Watts
86.87%
I’m comparing that to what others are seeing and, after watching DL2MAN’s calibration video, I may tweak things just a bit.
Not too much though – its pretty good out of the box.
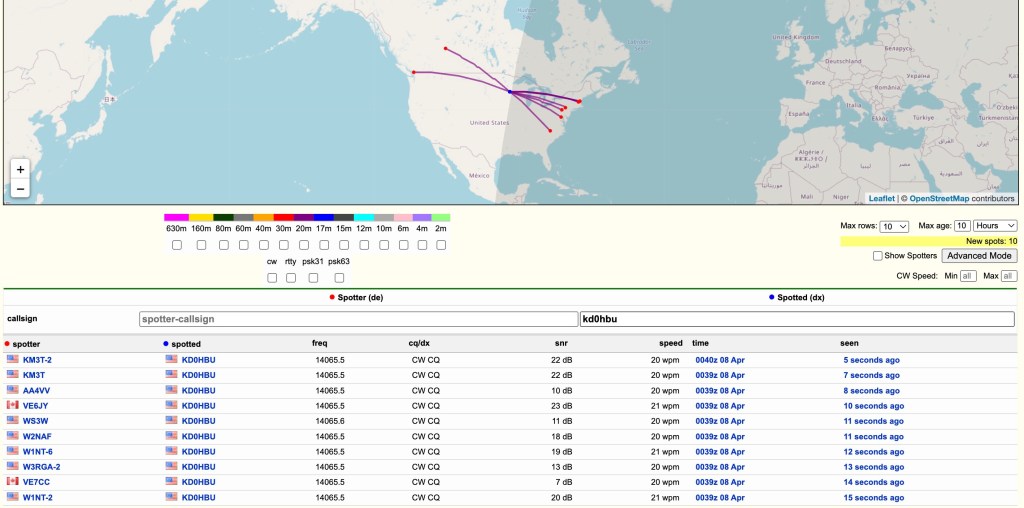
Next step was to get this on the air and see what RBN could see.
I hooked it up to my 20m Dipole which is suspended about 39-40 feet up in a tree.
Ok – so we know it gets out there 😉
I did call CQ a few times and even tried hunting a POTA activator or two, but given the time of day and the low power, I wasn’t getting through. I don’t think that is the fault of the rig, rather that I had only a bit of time that day to even try.
That and given 20 meter propagation, I generally can only reach the east, south, and west coats of the US that time of day, and the activators were all on the edges of that.
Oh well – more tries I guess are needed.
The audio quality is not as clear as I would have liked, even at this price point. The noise floor of the rig using an external speaker is still quite high. Playing with the noise attenuation settings can help, but there is a persistent static that you have to work through.
The Menus
This is where I need a lot more time with the radio.
DL2MAN has a page on his site that details all the menu options so I’m not going to go through them here. I will just say that it will take me a few times using the radio before I’m used to which button or knob does what.
That is not a negative, just the reality of the radio due to size, etc.
I will also say, however, that it is easier to navigate than my Mountain Topper MTR4B.
They’ve done a great job in trying to make the various navigation options clear and concise.
Audio
I’ve mentioned the audio already, and I just uploaded a small clip of both SSB and CW audio samples of live QSOs.
I will apologize for the ringing in the audio – I didn’t do a separate audio track overlay and the camera mic isn’t handling the external speak audio very well.
Final Thoughts
I have a lot more time that I need to spend with this little rig before I can fully say, with any degree of authority, how it performs in real use. I haven’t been this excited to get a new radio in a while – there is just something about the type of rig they’ve created here that really gets me going – and so far I am not disappointed.
My initial thoughts on pros/cons (note that the cons are nitpicking on my part – it really is a lot of radio in a small package)
Pros
Cost
Size
Multi-band
Multi-mode
Built-in mic
Built-in speaker
Can be bought assembled, as a kit, or you can get the parts together to build yourself
Supports Iambic A/B, and Straight Key modes
Cons
Different power cable connector than any other radio I own (small radio so other connectors would add bulk)
The OLED display can be hard to read in bright light (read outdoors)
Needs an SMA to BNC connector (supplied, but another thing to keep track of, though again it is expected given the size of this radio)
The speaker isn’t performant at any volume that you might need outdoors (at least not if there is anything making additional noise around you) – also expected given the size
Really, there isn’t a lot of cons at this price point and size.
This radio represents a tremendous advancement in small, portable radios that can be assembled at home and used in the field. Like I said previously, it is a lot of radio in a small package. I wouldn’t use it as a main POTA/SOTA rig full time, but I also haven’t had any field experience with it yet so I might eat those words.
This is a boon to amateur radio operators that people like DL2MAN and PE1NNZ are putting these out there for the public to take and create. Even if you never build or buy one of these radios, I believe they deserve a huge thank you from all of us for their efforts and time.
You can read about the project, including how to source the parts at DL2MAN’s website at http://dl2man.de
I spent the last week on a road trip that took me 3000+ miles (4800+ kilometers) round trip from Minnesota to Utah and back.
Upon return I found a new item in my mailbox.
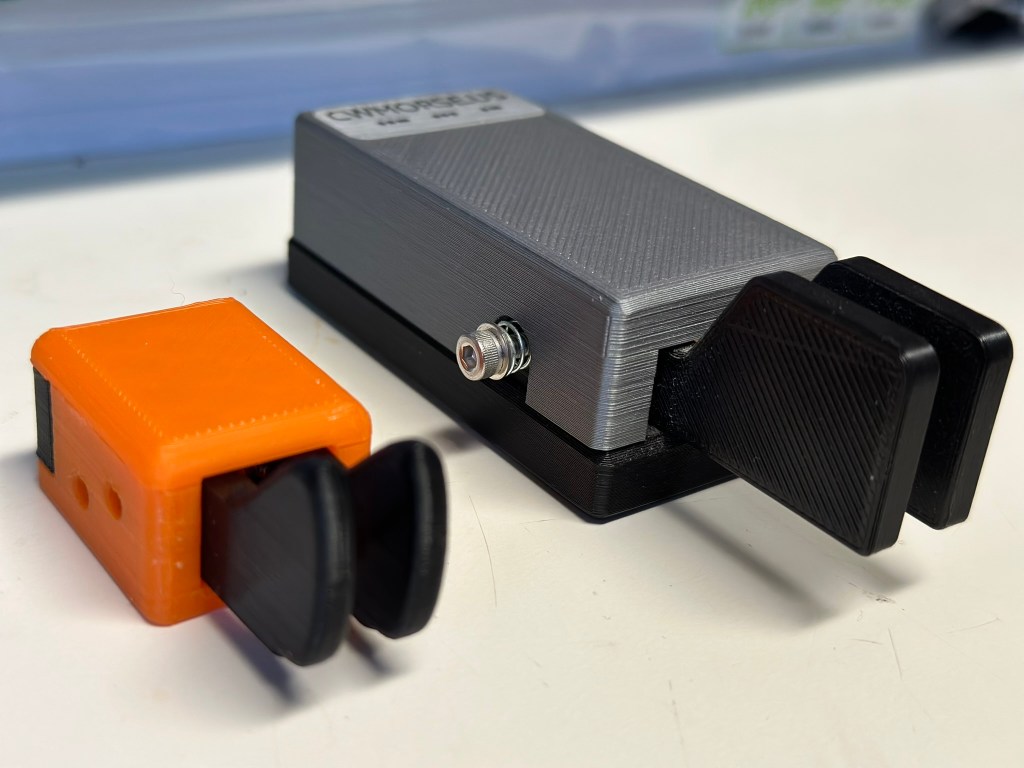
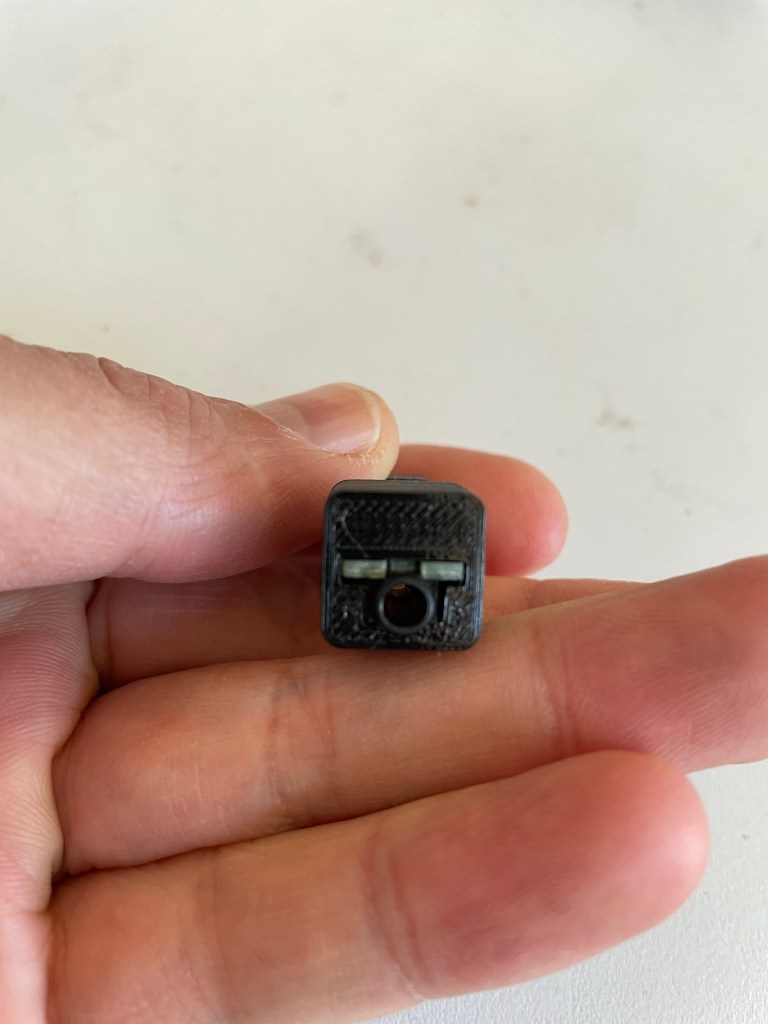
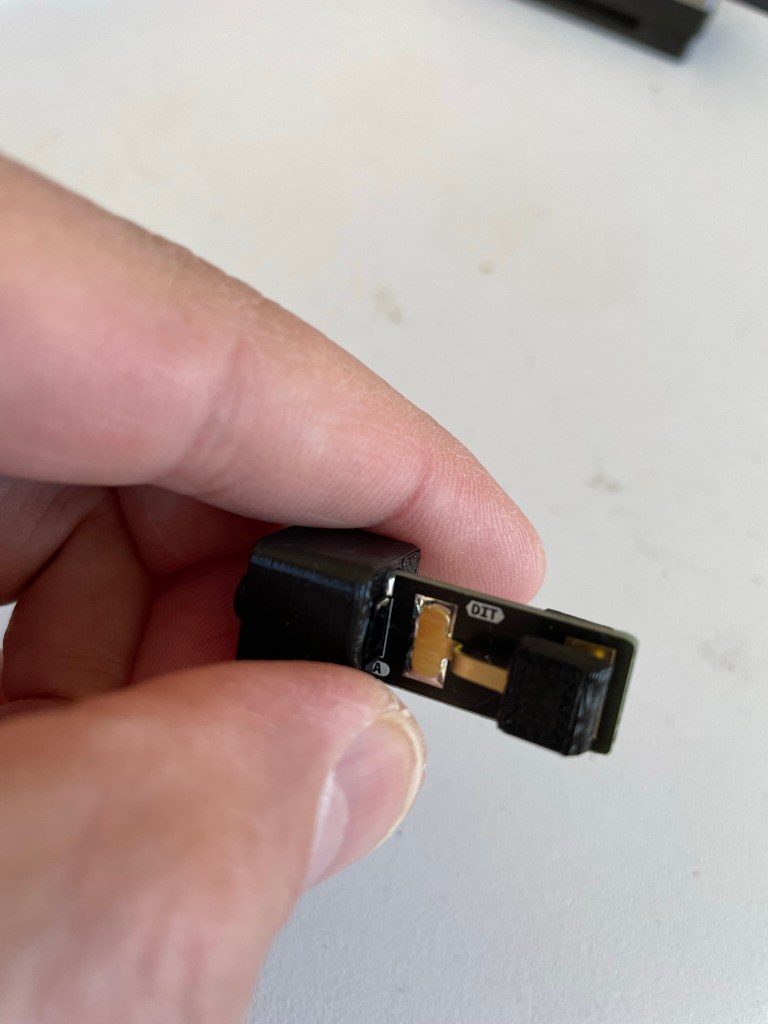
N6ARA makes what has to be – at least to my knowledge – the smallest CW paddle around.
I mean, this thing is really, really small.
The N6ARA TinyPaddle-Jack next to another popular 3D printed paddle from cwmorse.us – seriously awesome paddle that is also well constructed and great for portable use
Even having seen images online, it didn’t convey how truly tiny the TinyPaddle really is. I’m almost scared to lose it.
So what is the TinyPaddle-Jack?
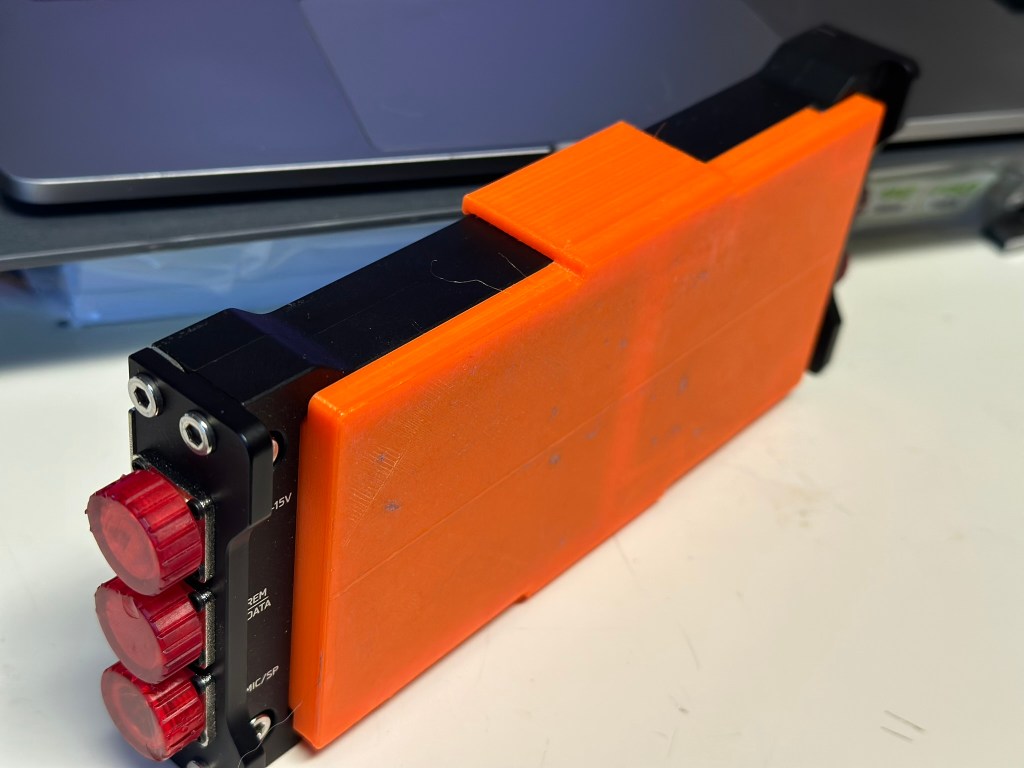
The TinyPaddle-Jack is a kit or preassembled backup or ultraportable iambic paddle. It is smartly designed as you will see, and superbly constructed.
The assembled paddle consists of the paddle and audio port (one piece), a 3D printed holder body (black in the images), a 3D printed holder cover (orange in the images), and an adjustment tool that clips onto the holder cover.
The holder cover allows the paddles to be protected in transit, and then by flipping the paddle around it becomes a holder extension that allows for one hand to hold the paddle in position while the other hand sends those glorious dits and dahs.
Some photos that hopefully do it justice.
Removed from the holder cover. You can see the audio jack at the top left of the paddle body.Audio jack side of the paddleCloseup of the working end of the paddle. Note that each side is labeled “DIT” and “DAH” so that you can quickly ensure that you’re holding it right.I would say that I have average sized hands for an adult male, so you can see how the paddles are quite small compared to my finger and thumb.
N6ARA has an overview video you can watch here.
Coming in at a svelte 0.3 ounces or 8 grams without the audio cable, it disappears into your kit and won’t weigh you down.
N6ARA also publishes STL files so that you can print your own parts for building or replacing pieces as needed.
I haven’t had this out and on the air – yet. I have spent quite a bit of time with this on my Morserino to get used to the size and make sure it is adjusted to my liking. I like to do that instead of making other operators suffer through my fist.
The size does take some getting used to. Again it is really small, and like most portable paddles requires the use of both hands to be effective. I’m not even sure you could mount this with Velcro or equivalent and still be able to keep it still. There is just too little surface area for me to be confident of any mounting solutions, though I have not tried any to date.
Having said all of that, I do like the feel of it. It is responsive, and after a couple of tries I found myself able to consistently send characters correctly at 20-22 wpm which is my current upper limit on other small paddles. Cranking things up to 25 wpm I started to hit enough errors that I wouldn’t go on the air with my skill level where it is with this paddle.
But that is more my personal failing and not the paddle.